The Futaba 8UAF or 8UAP radio control transmitter has an optional memory module, the DP-16K CAMPac module, that doubles the model storage capacity (to 16 models from 8) and allows you to save programs or transfer programs to another transmitter. The module can be purchased for about $90-$100 from hobby suppliers.
Recently, a number of individuals have developed a clone of the CAMPac module through the usenet group on the internet "rec.models.rc.air" that can be built for considerably less money. Credit goes to Jim White for blazing the trail, Dave Rigotti for discovering the receptacle part number, and Dave Tatosian for developing the Adobe Acrobat drawings. There are several versions of the design, but the following seems to be the latest (May 31, 1998).
"CLONEPac" Acrobat file
for download (36K).
Regular GIF image of the
CLONEPac Acrobat file (57K) for challenged printers like
mine, print as 4.1" width by 4.64" height for actual size
plans.
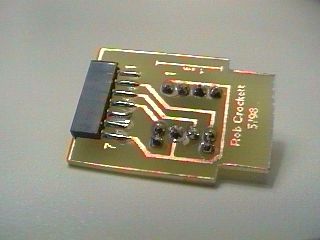
I've taken the Acrobat perf board plans and drawn out these
printed circuit board plans below.
Futaba offers a 64K version of the CAMPac module for their 9Z line of transmitters that will work in the 8U line, giving something like 43 model memory. The 64K version uses about 14 components including what seem to be 3-4 custom chips. Rest assured that this CLONEPac module is not designed to use and will not work with a 64K chip--only the 16K chip will work. People have tried to substitute in a 64K chip without success. Keep in mind that you can expand your model memory capacity further by swapping modules and you can build something like 30-40 CLONEPac modules for the price of a CAMPac module.
The length of the board is a maximum if you want the plastic dust cap to fit back over the memory module socket, so a little short is better than long. Too short and you will have trouble grabbing the board to pull it out.
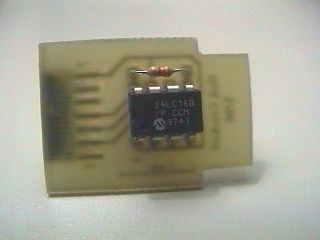
Note that the memory chip is static sensitive, so ground yourself before handling the chip.
The 8UAF pins end up passing all the way though the receptacle and protrude several mm beyond the receptacle, so make sure the receptacle pins end up on the circuit board side and will not block the 8UAF pins. Bend the receptacle pins so they contact the solder pads with the receptacle flat on the circuit board. To do this, hold the receptacle on a flat surface and press down on the midsection of each pin with a blunt flat tool--I used the blunt end of a needle nose pliers held vertically. Glue the receptacle to the foil side of the board. Use the adhesive of your choice . . . but do not use cyanoacrylate (CA), if you can avoid it, as it is conductive . . . I used a tiny spot of 15 minute epoxy. Finally solder the pins to the pads.
Triple check everything! This is your prized radio you are about to slide this creation into.
If you look into the CAMPac socket on your radio, you will see a 7-pin connector with a small white triangle above the right- hand pin. The triangle corresponds to pin one of your new memory module. Slide the module in with receptacle up and chip down. When you turn on your transmitter, you will see "INIT? EXT-MEM" with a series of beeps. Press the Plus (+) DATA INPUT key, and away it will go. After initializing, you'll see "Pac" next to the word "Model" at the upper right of the display, and you will have 16 model memory instead of 8.
These part numbers are from DigiKey electronics corp.
Order 1-800-344-4539 or order online at Digi-Key Corporation Home
Page. Get the PC Board to etch your own, or get the
Vector Board to wire it by hand (no need to get both).
| PN | Description | Price |
| V1043-ND | Vector (perf) Board | 5.43 each |
| PC5-ND | 1/16" Copper PC board, 3x4.5" | 2.78 each |
| 24LC16B/P-ND | Serial EEPROM | 1.31 each |
| 2063S-07-ND | 2mm Receptacle | 2.02 each |
| 3.3KEBK-ND | 3.3K Resistor 1/8 watt | 0.28 per five |
Written by Rob Crockett, 6/98.